Overview > Instructional Help > ACT! Call List Pop Up Help

Call List Pop Up Help
In this Help document, you will learn the following:
1) The Call List – a definition
2) Getting started with the Call List
3) Sync a Call List into ACT!
4) Marketing Results Call List Features Overview
5) Marketing Results Call List Lookup and Group Features
6) Marketing Results Call List Actions Feature
7) Marketing Results Call List Options
The Call List – a definition
Sage E-marketing now provides the “Marketing Results” sales tool within ACT!. Included in the Marketing Results sales tool is the Call List.
The Call List is a ranked list of your ACT! contacts based on their interaction with one or more of the E-mail campaigns they received from you. When an E-mail recipient opens your E-mail, or clicks on links in your E-mail, they are given a Call List Score that is used to create the Swiftpage Call List. The Call List Score is designed to tell your Sales Team which of your recipients are more interested or “Hotter” than other recipients, and are therefore the people you should be calling first!
Call Lists are created & stored online and can be synced into your ACT! database. Syncing a Call List into ACT! gives you direct access to some of the most important and up-to-date information you have about your ACT! contacts. Use the Swiftpage Call List combined with your existing ACT! data, combined with our other Marketing Results Sales Tools to help close more sales.
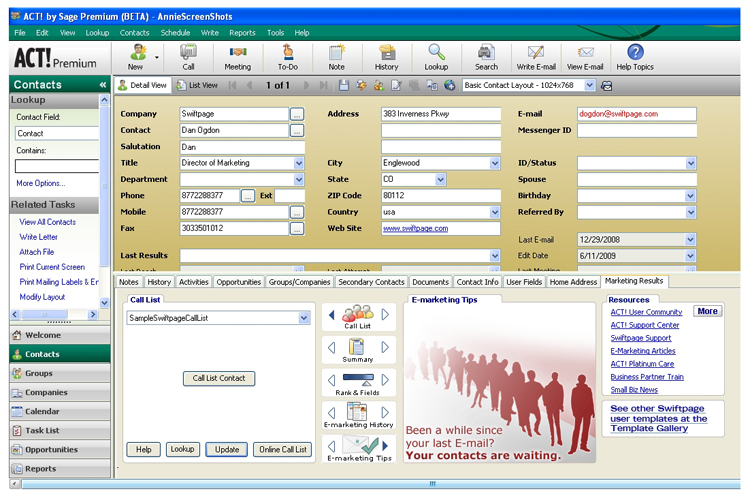
Once you have created a Call List and have “Synced” it into ACT!, it will appear in your new Marketing Results Tab in the ACT! contact view. (see the following picture)
Getting started with the Call List
Marketing Results provides you with a sample call list called “SampleCallList”. The first time you use the Marketing Results Call List it will automatically try to sync to this sample call list”. When the first sync is compete, you will have an option to watch a video demonstration. Please watch this video to find more detailed information about Marketing Results and the Marketing Results Call List.
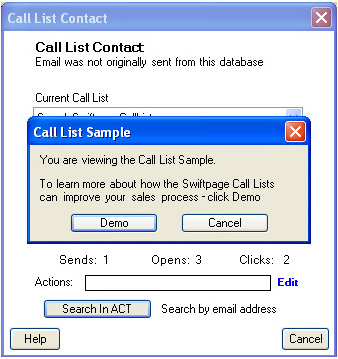
Note: After you have watched the video demonstration and return to ACT!, you will see a screen telling you that this particular contact was not E-mailed from your database. This contact is not in your database because it is a “dummy” contact used to demonstrate the Call List.

Clicking “Search in ACT” performs a search of your ACT! database by E-mail address for this contact. In general, if the contact is found, the contact will be displayed in the Call List window. If the contact is not found, you will be given the option to add the contact to your database.
If you do not wish to search your database for this contact, click the “Cancel” button. (Recommended)
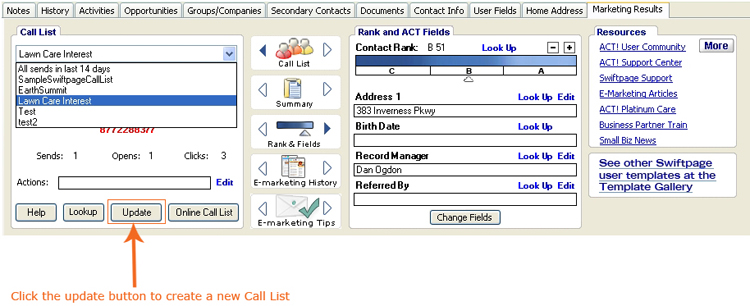
After clicking “Cancel” you will not be synced to any Call List. When you are not synced to an online Call List, we provide you with a few different options within the Call List window. Typically you will choose a previously made Call List to sync to, or create a new Call List (see below). For first time users, you will want to click on the “Update” button to create a new Call List. (Note*: Please keep in mind that you will need to send a Swiftpage E-mail campaign prior to creating a Call List.)
(Note: For instructions on how to create a Call List online please view our Online Call List Help )
Sync your Call List into ACT!
Any Call List you have created can be synced into your ACT! database. To sync a Call List, open the Marketing Results Tab in your ACT! contact view, and then click the Call List button.
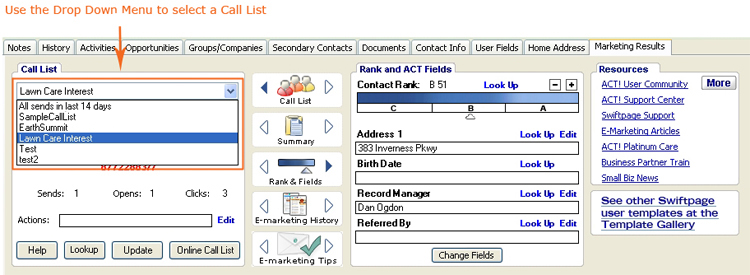
The first time you open the Marketing Results Call List in ACT!, Swiftpage will attempt to sync to the Call List you were last synced to. At any point in time you can sync to a different Call list by using the “Drop Down Menu” – shown below
Clicking the “Update” button or “Online Call List” button will open the Call List Online. Once online you have the ability to create new call lists or update, delete, and edit existing Call Lists. When you are finished online, come back to ACT!. The Call List will look like the screen below.
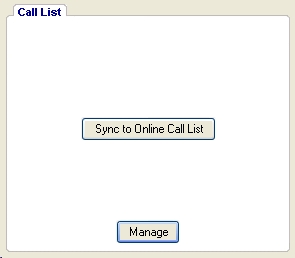
To you sync your Call List press the “Sync to Online Call List” button.
Marketing Results Call List Features Overview
When viewing the Marketing Results Call List, you will be seen 1 of 3 different views:
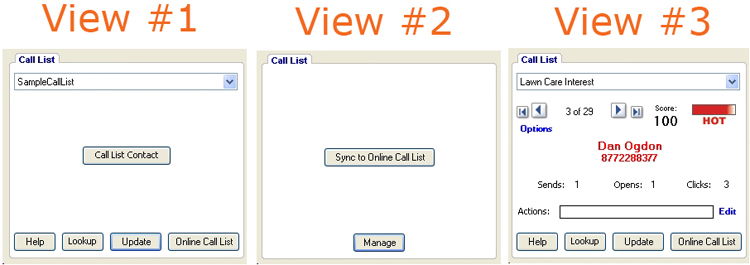
View #1:
You will see Call List View #1 when you are synced to a Call List, but the contact you are trying to view is not shown because of the options set in the Call List Options menu. Pressing the “Call List Contact” button will show you the contact and let you decide if you wish to see them in the Call List window.
View #2
After creating, updating, or editing a Call List online Swiftpage needs to re-sync the Call List. Press the “Sync to Online Call List” button to sync your current Call List into ACT!. Clicking the “Manage” button will take you to the Call List Manager online to manage all of your Call Lists.
View #3
When properly synced to a contact in your Call List, you will see View #3. This view is explained below.
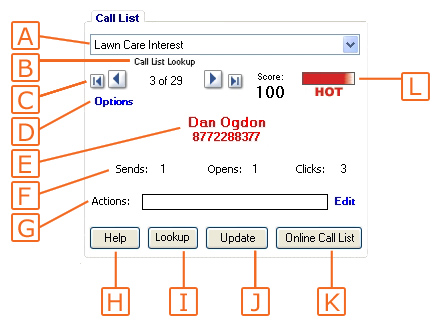
A. Call List Drop Down Menu – Using the drop down menu you can access any Call List you have created. “SampleCallList” and “All Sends In Last 14 Days” Call Lists are provided for you.
B. Filter Text – This text describes any filters that may be currently applied to your Call List within ACT!. These filters affect which Call List contacts are viewable.
I. “Call List Lookup” – This text means that you are currently scrolling through a Call List Lookup that was created using the Lookup button (item I).
II. “Skip Actions” – This text means that any contacts with a “Action” will be skipped while scrolling through your Call List. See item G to learn about Actions. “Skip Actions” can be set in the Options menu (item D)
III. “Skip Actions in Call List Lookup” – This text means that you are currently in a Call List Lookup and any contacts with an Action will be skipped when scrolling through your contacts.
C. Scrolling Arrows – Allow you to scroll through your Call List contacts. Using the scrolling arrows will change the contact you are currently viewing in ACT!.
D. Options Menu – The options menu gives you access to certain Call List options. See the Call List Options section for more information.
E. Call List Contact – Shows the current ACT! contact’s name and phone number.
F. Sends, Opens & Clicks – Shows how many E-mails you sent the current contact, how many times they opened those E-mails, and how many links they clicked on within those E-mails. The open and click data helps create the “Call List Score” (item L).
G. Actions – Swiftpage gives you the ability to store an action for each of your Call List contacts. Typically actions are used to help you keep track of the contacts you have Called or Followed-up with. Once you have set an action for a Call List contact, you can use the Call List filters to view only “Actioned” contacts, or only contacts without Actions. Swiftpage Actions help you to easily and effectively manage your call list. Learn more about Swiftpage Actions in the Marketing Results Call List Actions section
H. Help – a link to this Marketing Results Call List help page.
I. Lookup – The Lookup button provides an easy way to create an ACT! Lookup or Group out of your Call List Contacts. The Lookup menu is described in the Call List Lookup and Group section.
J. Update – The Update button opens a web browser, giving you access to all of your Call Lists Online. Note* Call List data is “Real-Time” data, but you must “Update” each Call List to access that data.
K. Online Call list – Opens a web browser, giving you access to the current Call List in an online list form. You can filter your call list and edit contact actions online before you sync your Call List if you wish.
L. Call List Score – Swiftpage creates a Score based on your recipients interaction with your E-mail campaigns. The more your recipients open your E-mails and click on the links within your E-mails, the higher their Call List Score will be.
Marketing Results Call List Lookup and Group Features
The “Lookup” button allows you to create an ACT! Lookup or ACT! Group from your Call List contacts.
Using the provided filtering options you can create a Lookup or Group from a specific set of contacts within your Call List. The filtering options allow you to filter your Call List contacts by Score, Action or both.
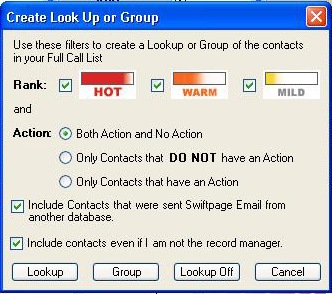
For example, if you wish to create an ACT! Lookup of only your “Hot” contacts, you will only check the box next to “Hot”, and select the “Both Action and No Actions” radial button. Then click “Lookup”. This will provide you with an ACT! Lookup of only your “Hot” prospects.
Some notes about the Call List Lookup Feature:
- A Call List Lookup cannot contain more than 100 contacts. Filtering and using actions will help you whittle your Call List into manageable 100 contact chunks.
- If you have created a Call List Lookup you may not be viewing your entire Call List. To view your “Full” Call list, click the “Lookup off” button in the Lookup menu.
- Call List contacts that were sent Swiftpage E-mail from another ACT! database will require more time to Lookup.
- While in the ACT! contact view, you can scroll through your Call List Lookup using either the ACT! navigation arrows in the top left hand corner of ACT!, or the Call List navigation arrows.
- If the “Marketing Results Lookup” field has been added to your ACT! database, your Call List Lookup will be automatically sorted by the Call List Score.
- If the “Marketing Results Lookup” field has NOT been added to your ACT! database, your Call List Lookups will not be sorted by the Call List score.
Marketing Results Call List Actions Feature
A Call List “Action” can be set for each of your Call List Contacts. This Action can be set Online or in ACT!.
In ACT! press the Edit button next to the Action menu. See below.
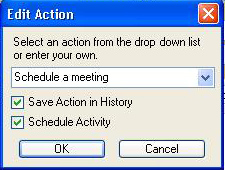
You can choose any of the pre-defined actions for your contact (ie. Called, E-mailed, Followed-up, etc.) or type in any action you would like. After selecting your action, you can choose to save the action in History and set an ACT! Activity for the contact if you wish to.
While Call List Actions can be used to enter any relevant information about your contacts, they were designed to help your Sales Team work systematically through each Call List.
For example, if you are given a new Call List, you will want to start at the top and call the first contact on the list. While speaking with the contact they may wish to schedule an appointment with you at a later date. In this case you can set the action for this contact to “Called” and then set an ACT! activity to meet with them at a later date.
Marketing Results Call List Options
Marketing Results Call List Options allow you to set how you scroll through your Call Lists. The following options are provided:
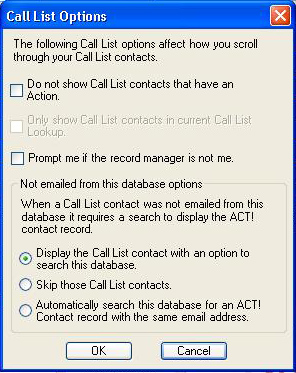
- Do not show Call List contacts that have an Action. – If this checkbox is checked, any contacts with an Action will be skipped when scrolling through your Call List. Using this option allows you to focus on the contacts that you have not yet followed up with.
- Only show Call List contacts in the current Call List Lookup. – This option is only available if you have not added the field “Marketing Results Lookup” to your ACT! database. This option allows you to skip contacts that are in your Call List, but not in the Call List Lookup you created. We recommend adding the “Marketing Results Lookup” field to your database to avoid this option.
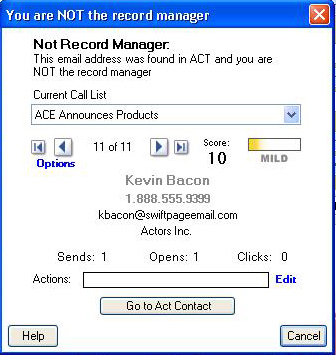
- Prompt me if the Record Manager is not me – ACT! has a built in feature called the Record Manager. The ACT! Record Manager can be used to specify “ownership” of contacts in your database. If you use the ACT! Record Manager field, Swiftpage can notify you if the current contact is “owned” by someone else using your ACT! database. If this option is selected you will see the screen below when you reach a contact that you are not the Record Manager of.
The other options relate only to contacts who were E-mailed Swiftpage E-mail from another database. For example, you may have a contact that resides in an ACT! database and in Outlook. If you used Swiftpage for Outlook to E-mail this contact, and then created a Call List from that E-mail, this would be considered a contact that was E-mailed from another database.
Contacts E-mailed from another database options:
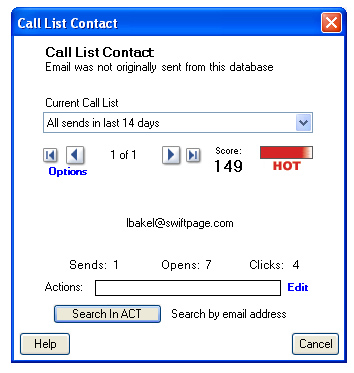
- Display the Call List contact with an option to search this database. – You will be notified every time a Call List contact is reached that was not E-mailed from this database. Once notified we give you the option to search your ACT! database by E-mail address for this contact. If this option is checked you will see the screen below.
- Skip those Call List contacts – Automatically skips any contacts that were E-mailed from another database when scrolling through your Call list.
- Automatically search this database for an ACT! contact record with the same E-mail address – does exactly that while scrolling through your Call List contacts. This option requires more time, but allows you to find all contacts by their E-mail address.
If you choose to “Search in ACT!” and the contact is not found, the following screen will appear.
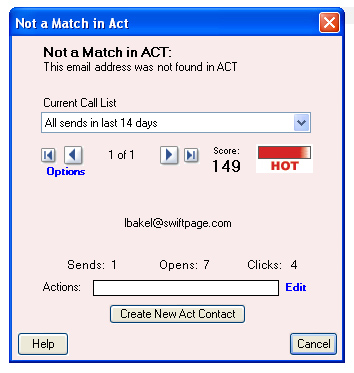
This screen allows you to Add the contact to your ACT! database by clicking the “Create New ACT Contact” button.