Overview > Instructional Help > E-mail Tab

E-mail Tab
The following picture shows the Sage E-marketing Plug-In, numbered with corresponding explanations.
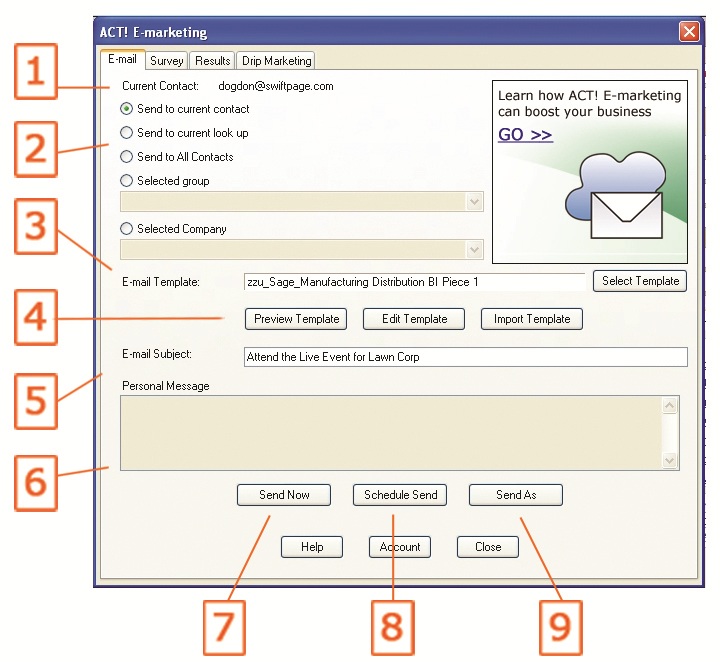
- Current Contact: Shows your current contact within your ACT! Database.
- Options of who to send your E-mail to:
- Send to Current Contact: Send to contact listed.
- Send to Current Lookup: If you do a “Lookup” within your ACT! database, this will send an E-mail to everyone in that lookup.
- Send to All Contacts: Sends to all of the contacts in your ACT! database. Note that this is limited by the number of people your account plan permits.
- Selected Group: Sends an E-mail to a group within ACT!.
- Selected Company: Sends an E-mail to a company that you have saved within ACT!.
- E-mail Template: From your personal template library, choose the Swiftpage template you want to use.
- Preview, Edit and Import Template buttons: Allow you to preview, edit and import E-mail templates online. Click these buttons to access each part of the online interface.
- E-mail Subject: Type in the subject text you want to include with this E-mail.
- Personal Message: Provides the option to type in a Personal Message if the selected template has a [[SpePersonalMessage]] tag.
Preview shows the user the template with the personal message inserted.
- Send Now: Sends your selected template to the selected contact(s) right now.
- Schedule Send: Enables you to schedule your E-mail blast to go out on a specific later date and time.
- Send As: Allows you to send your E-mail as a different user, as long as that user is in your ACT! database.
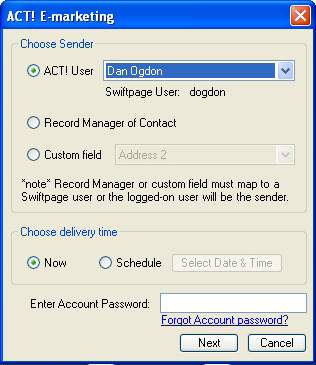
Choose Sender Options:
- Select the ACT! user you would like to “Send As” from the drop down menu, or choose to send as the ACT! “Record Manager”, or as a Custom Field you have created.
Please note: You may “Send As” any ACT! database user that is also setup as a user on your Swiftpage account. If you have other ACT! database users, but they do not show up in the drop down menu, then they will need to be added to your Swiftpage account. If you have other Swiftpage users, but they do not appear in this drop down, then each Swiftpage user will need a corresponding ACT! database profile.
- Choose your delivery time, then enter your Account Password, (the Account Manager should have the Account password).
- Select the ACT! user you would like to “Send As” from the drop down menu, or choose to send as the ACT! “Record Manager”, or as a Custom Field you have created.
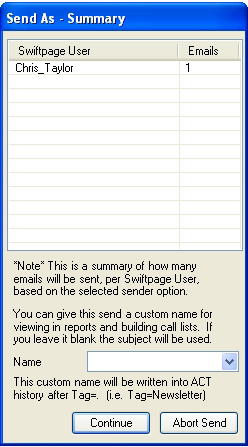
Send As - Summary: Lets you know how many E-mails are being Sent As specific Swiftpage users. The “Name” field near the bottom allows you to give your E-mail blast a title to view later. The Name field allows you to send similar E-mail blasts to different groups of people and is primarily used after you send your E-mail for creating call lists.
Please Note: “Send As” is a “Marketing Results” feature. To enable this feature your account may need to be upgraded.
- Account: The “Account” button gives you access to your account information. Click here to upgrade your account, or add a Swiftpage UserID. To add a Swiftpage UserID, you must have another ACT! user in your database. To add, click the Add User button, and fill in the appropriate fields.